Friday, 15 November 2019

Building a Prime Lens Kit


Zoom Lenses

When I first set out on my photography journey I used zoom lenses as they offer a lot of flexibility and are a perfect starting point for any would-be photographer. In fact a lot of camera bodies are available with a cheap zoom lens bundled as part of the package. Despite this versatility they do have the caveat that they tend to not be as sharp as prime lenses. 

Along with the 18-55mm kit lens that came with my first camera, another of my first zoom lenses that I bought was an 18-200mm f3.5-f6.3. During my initial phase in photography this lens practically lived on my camera as it seemed like a great all-round lens. The focal range was superb which afforded me great versatility but optically it was far from great. Images lacked sharpness and the colours weren't quite right. It also had a very slow and noisy autofocus motor and of course you lose a lot of light when zoomed in to 200mm due to the lens not having a steady aperture throughout the focal range. To combat that I would have to use a slower shutter speed or if that wasn't possible a higher ISO which in turn produced a more grainy and poorer quality image.

I then moved on and bought both 24-70mm and 70-200mm f2.8 lenses. These lenses both came at a significant cost but are both great lenses which served me well for my needs. In fact I still own them but rarely use them now.

Advantages to zoom lenses:
  • Versatile as the photographer doesn't have to move about as much
  • Don't have to carry as many lenses
  • Speed - ability to capture at different focal lengths quickly without having to change lenses
Disadvantages to zoom lenses:
  • High quality zoom lenses with fixed apertures can be pricey
  • Not as sharp as prime lenses
  • Tend to be bigger and heavier than prime lenses
  • Apertures not as wide as prime lenses


Prime Lenses

Prime lenses are lenses with a fixed focal length. So if you need to change your composition and move closer to or further from your subject you would need to physically do so as there is no means to do this via the lens.

In more recent years I have turned more towards prime lenses and in fact aside from occasionally using a 16-35mm for interior work I now use primes exclusively. Prime lenses tend to be a lot sharper than zoom lenses as they are dedicated to optimally work at a specific focal length and there is less glass that moves around in the lens which reduces diffraction.

With prime lenses it’s possible to shoot in lower light situations as they feature wider apertures than the typical f2.8 of a zoom lens so you can get lenses which shoot at f1.4 or sometimes even wider. A result of having a wider aperture is that you can achieve a much shallower depth of field (DOF). They can also force you to think more about each shot and make you a more creative photographer as you don’t have the luxury of standing in one spot and zooming. You have to “zoom with your feet”.

Advantages to prime lenses:
  • Cheaper than zoom lenses
  • Sharper than zoom lenses as there is less moveable glass to cause diffraction
  • Ability to shoot in lower light situations due to wider apertures
  • Usually smaller and weigh less than zoom lenses
  • Make you a more creative photographer as you think more about each shot
Disadvantages to prime lenses:
  • You need to carry more lenses to cover more focal lengths
  • Cannot zoom
  • You need to change lenses if you want another focal length
Samyang AF 35mm f1.4 FE on a shoot


The lenses I use

There are a number of prime lenses that I use on a regular basis which I find would form part of an essential prime lens kit for most photographers. A 35mm f1.4, a 50mm f1.4 and an 85mm f1.4. These three lenses will cover most situations for most photographers. I know a lot of wedding photographers who indeed just use these three lenses to cover an entire wedding with amazing results. When shooting food for various clients I tend to use the three mentioned above but also add in a dedicated macro lens for close up detail shots of the food. So for this Samyang’s 100mm f2.8 macro lens is perfect.


85mm lens is not just great for portraiture

An 85mm lens is pretty much ideally suited to portrait photography as it gives a good amount of compression between the subject and the background. An essential piece of kit for any wedding photographer as it allows you to be a little further away from your subject. At this focal length it doesn’t distort facial features like a wide angle lens would. I use my 85mm to get beautiful, detailed images of drinks/food where I need to isolate the subject from the background by using a relatively wide aperture to capture a shallow DOF with stunning bokeh (out of focus elements). This can also be used on a cropped sensor camera and give a focal length of around 127mm depending on crop factor.
 
Sony A7Riii with Samyang AF 85mm f1.4 FE @ 1/160th, f3.5, ISO 160


The "Nifty Fifty"

A 50mm lens is also sometimes referred to as a "Nifty Fifty" as you can get cheap versions which offer great bang for buck performance and usually come with an f1.8 aperture. This is possibly my most used focal length. I love using my Samyang AF 50mm f1.4 FE when taking candid photos of my family or for shameless self portraits. I also use it heavily for food photography as it can pretty much be used at any angle including top-down or side on for images of food. This lens creates beautiful bokeh in the image allowing you to make your subject stand out from the background. At this focal length you still don't get much distortion as you would with wider lenses and it compresses the background and subject together nicely. This can also be used on a cropped sensor camera and give a focal length of around 75mm depending on crop factor.


Sony A7Riii with Samyang AF 50mm f1.4 FE @ 1/100th, f11, ISO 200

Everyone needs a 35mm right?

A 35mm lens has a similar angle of view to what the human eye sees so has to be one of the most versatile focal lengths and can be used for just about anything ranging from street photography to architecture to wedding photography amongst others. I tend to use my Samyang AF 35mm f1.4 FE when photographing overhead food shots of multiple dishes to get as much in the shot as possible without having to position the camera as high as I would if was shooting with a 50mm or longer focal length. This can also be used on a cropped sensor camera and give a focal length of around 52mm depending on crop factor.


Sony A7Riii with Samyang AF 35mm f1.4 FE @ 1/100th, f13, ISO 200

Macro Lenses - great for close-ups and so much more

Macro lenses are essential if you want to shoot close up images. These lenses have very close minimum focus distances which allow the camera to get closer to the subject. They also feature a really narrow minimum aperture so that you can control what you want in focus. Dedicated macro lenses are also renowned for being the sharpest type of lens with its main use being for highly detailed images. They also make great portrait lenses as the focal length is usually pretty long, around 90mm - 180mm. The typical aperture range on a macro lens is f2.8 - f32 as the closer you are to the subject the shallower the DOF so a narrow aperture is essential to retain as much detail and focus as possible. The caveat with shooting with such narrow apertures such as f32 then the amount of light be allowed onto the sensor is very little so to compensate you would need to either use a faster shutter speed, higher ISO, a tripod or introduce flashes or studio strobes. I shoot food using a studio strobe so I can keep my ISO down which will also give me a better quality image.


Conclusion

Zoom lenses offer a great deal in terms of flexibility and as such I think are a great way to discover as a beginner what you like to shoot. Both types of lenses have their advantages and disadvantages but I think that after experiencing different types of photography the quality in terms of image sharpness and the ability to shoot in low light will be a major determining factor which will steer most photographers in the direction of prime lenses. If you are trying to capture images with stunning bokeh then a prime lens is a must. Prime lenses will make you a more creative photographer and you certainly can't go wrong by getting a 35mm, a 50mm and an 85mm. If you're a landscape shooter and want something wider than 35mm, Samyang also has a great range of options for you.  From the ultra-wide AF 14mm f2.8 which offers great optics at a very good price to the smaller "pancake" lenses - AF 18mm f2.8, AF 24mm f2.8. Let's not forget the tiny AF 35mm f2.8 which is a very capable lens and great for travel photography and the AF 45mm f1.8 (which fits right in between the 35mm and 50mm range). Out of all these lenses there's something for everyone.

Below are some images captured using some of the lenses mentioned above:


Sony A7R with Samyang AF 50mm f1.4 FE @ 1/80th, f3.5, ISO 64
Sony A7R with Samyang AF 50mm f1.4 FE @ 1/100th, f2.8, ISO 100
Sony A7Riii with Samyang AF 35mm f1.4 FE @ 1/160th, f8, ISO 125
Sony A7R with Samyang AF 50mm f1.4 FE @ 1/50th, f2.2, ISO 200
Sony A7R with Samyang AF 50mm f1.4 FE @ 1/160th, f8, ISO 200
Sony A7Riii with Samyang AF 35mm f1.4 FE @ 1/320th, f10, ISO 100
Sony A7Riii (Crop Mode) with Samyang AF 50mm f1.4 FE @ 1/160th, f5, ISO 125
Sony A7R with Samyang AF 14mm f2.8 FE @ 1/25th, f4, ISO 64


Sony A7R with Samyang AF 24mm f2.8 FE @ 1/500th, f5, ISO 100


Sony A7R with Samyang AF 24mm f2.8 FE @ 1/200th, f4, ISO 100


Sony A7R with Samyang AF 35mm f2.8 FE @ 1/30th, f9, ISO 100
Sony A7R with Samyang AF 35mm f1.4 FE @ 1/125th, f2.2, ISO 64
Sony A7Riii with Samyang AF 85mm f1.4 FE @ 1/250th, f11, ISO 100

Sony A7Riii with Samyang AF 85mm f1.4 FE @ 1/200th, f13, ISO 200


Thanks for reading!

For more information on Samyang products please take a look at their website - samyanglensglobal.com and subscribe to their newsletter to keep up to date with product news. If you're based in the UK then check out UK distributor Intro 2020.

Follow me on my social media channels:

Wednesday, 19 June 2019

Shooting Food with Samyang XP 85mm f1.2


Samyang's stunning XP 85mm f1.2 lens is not just a great lens for portrait photography, it's also a lens that can be used to create beautiful food photography. Due to it's manual focusing system, still life photography seems like the perfect match. With food photography the photographer has time to compose each frame so a speedy auto-focusing system isn't a necessity. I use my XP 85mm via an adapter on my Sony A7RIII and the images that this combination produces are stunning with razor sharp details, vibrant colours and punchy contrast - just what you want when photographing food to make it look as appetising as possible.


When it comes to food photography, getting the right light is essential. As I shoot for a lot of different restaurants it's not always possible to have a location at the restaurant to setup near a window or space where there's a good source of natural light. For that reason I always take a studio strobe and a large softbox. This allows me the freedom to setup anywhere in the restaurant and gives me a powerful, controllable light source that is softened depending on the size of the light modifier - in most cases I use a 120cm x 80cm Phot-R softbox with double diffusion.

Here's my usual setup for food photography


In terms of getting the composition and point of focus perfect using the XP 85mm f1.2 lens I occasionally use a tripod but most of the images in this article were shot handheld so I heavily rely on the amazing focus peaking feature built-in to my Sony A7RIII. This feature shows exactly what's in focus in my EVF or on my screen by detecting edges of high contrast (and therefore most in focus) and displaying a red border around them. I then zoom in (using the camera's focus zoom feature) on the specific area that I want in focus and then rotate the focus ring until it has perfect focus - a very easy process for me with my mirrorless camera. Due to DSLRs having an optical viewfinder this whole process could be a lot more difficult and I'd imagine a tripod would be essential.

I love the bokeh (out of focus blur) that the XP 85mm f1.2 lens is capable of producing. It can help to isolate the subject from the background. Perfect for a side on shot like some of the cocktail images towards the bottom of this article. With a minimum focus distance of 80cm it allows me to get close enough to capture some of the finer details of a dish with precise sharpness. This lens really is a joy to use especially for this specific application. Check out some images below that have been taken with it.


Sony A7RIII - f4, 1/80th, ISO 160
Sony A7RIII - f4, 1/125th, ISO 160
Sony A7RIII - f4, 1/80th, ISO 160

Sony A7RIII - f4.5, 1/200th, ISO 100
Sony A7RIII - f4, 1/160th, ISO 100
Sony A7RIII - f4.5, 1/160th, ISO 64


Sony A7RIII - f7.1, 1/160th, ISO 160


Sony A7RIII - f6.3, 1/125th, ISO 160


Sony A7RIII - f5, 1/160th, ISO 100

Sony A7RIII - f8, 1/160th, ISO 125

Sony A7RIII - f9, 1/160th, ISO 200

Sony A7RIII - f5, 1/200th, ISO 800


Sony A7RIII - f3.5, 1/200th, ISO 250

Sony A7RIII - f2.8, 1/200th, ISO 250

Sony A7RIII - f2.8, 1/125th, ISO 160


Thanks for reading!

Check out my initial review for the Samyang XP 85mm f1.2 featured in this article that I wrote a while back HERE

For more information on Samyang products please take a look at their website - samyanglensglobal.com and subscribe to their newsletter to keep up to date with product news.

Follow me on my social media channels:

Monday, 4 February 2019

Shooting New York With Samyang


New York's famous yellow cabs
(Samyang AF 14mm f2.8 FE @ 1/250th sec, f8, ISO 100)
New York is without doubt the most photographed city in the world and a place that I will go back to time and time again. It's easily the most awe inspiring city that I've visited. I've been fortunate enough to have visited three times in the last ten years with my last visit in June 2017. Each time I've visited I've managed to cram in various sites, experienced a lot of what this bustling city has to offer and each time my stay is different but I still feel like I've just seen the tip of the iceberg.


Samyang AF 35mm f2.8 FE @ 1/30th sec, f3.2, ISO 800
Of the many things I love about Manhattan one of them has to be the geographical layout, which mainly comprises of a grid system with avenues running vertical and the streets horizontal so it's surprisingly easy to find your way around and get to various places provided you have the street address or avenue that it's on. Using the subway is relatively easy also. I'd recommend downloading a couple of apps for your smartphone to help you find your way around.


It was around the time of my second visit to Manhattan that I started to get into photography back in March 2013. I hired a Samyang 8mm fisheye lens especially for my trip to use with my Sony A65. It was great fun to use to capture unique images with crazy distortions and have the ability to fit so much into each frame. One of the images that I captured during this trip (taken at the observation deck at the Rockefeller Center) is to this day one of the most viewed images on my Flickr account with over 30,000 views and even made it onto the Flickr Explore page when it was first posted. When I shot this image I didn't really know what I was doing when it came to photography. It wasn't shot in RAW, the sensor had a load of dust spots on there (Photoshopped out) and I probably shot the image using Auto settings apart from the manual focus and manual aperture settings on the lens so I think this image could have been significantly better but I'm still happy with it.
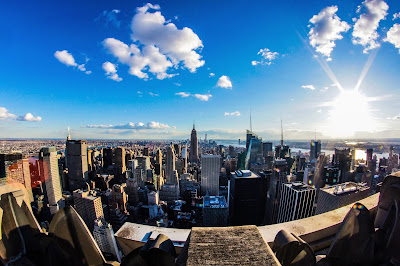
Samyang 8mm f3.5 Fisheye @ 1/100th sec, unknown aperture, ISO 400


Having visited the Top of the Rock observation deck during a previous visit I knew that this would afford me the greatest vantage point over the city. In my opinion the view from there is better than the Empire State Building as you can see Central Park and downtown Manhattan (including the Empire State Building itself which makes a great focal point in the frame). It also features a more unrestricted viewing platform to the Empire State Building and even the One World Trade Center which has glass windows obstructing your view making it difficult to shoot good images. While here I shot images with both the AF 14mm f2.8 FE and the AF 35mm F2.8 FE lenses.
Samyang AF 35mm f2.8 FE @ 1/30th sec, f5, ISO 100
Samyang AF 14mm f2.8 FE @ 1/40th sec, f9, ISO 200

Samyang AF 35mm f2.8 FE @ 1/30th sec, f9, ISO 100


Here's another shot of the New York skyline. This time at night with the busy city traffic lighting up the streets below. This image was taken from the rooftop of hotel Ink 48.
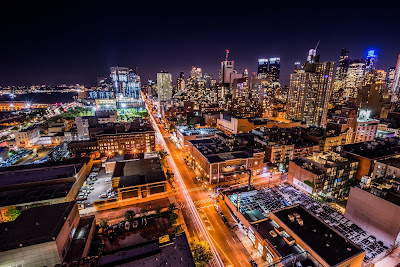
Samyang AF 14mm f2.8 FE @ 30 seconds, f11, ISO 100


New York is well-known for it's skyscrapers and has some of the largest and most diversely designed buildings in the world. This shot was taken near the financial district. At the top of the frame you can just about see the iconic building which houses the famous Delmonico's restaurant. At the time I shot this, the restaurant had scaffolding up so it kind of ruined the concept of an image I had in mind so instead I looked up and saw this composition.

Samyang AF 14mm f2.8 FE @ 1/200th sec, f8, ISO 100


Another of New York's most famous landmarks is the Flatiron Building. Situated on 5th Avenue between E22nd and E23rd Street this building is easily one of the most iconic buildings in Manhattan. The Beaux-arts architecture also appears in the Spiderman films due to the Daily Bugle newspaper (where Peter Parker works) being based there. This is one of the most photographed buildings in the world.
Samyang AF 35mm f2.8 FE @ 1/250th sec, f9, ISO 100

Samyang AF 14mm f2.8 FE @ 1/30th sec, f22, ISO 50


When visiting New York it is essential that you walk the Brooklyn Bridge. Spanning a distance of just over 1.8km it's possible to take in incredible views of the city and create visually stunning images using the lines of the bridge cables and supports but be careful not to get in the way of the cyclists and runners. There's a cycle lane for a reason.
Samyang AF 14mm f2.8 FE @ 1/20th sec, f22, ISO 50
Samyang AF 35mm f2.8 FE @ 1/320th sec, f10, ISO 100


If you venture over the Brooklyn Bridge then you have visit D.U.M.B.O (Down Under the Manhattan Bridge Overpass). Here you will find Washington Street and it's amazing perspective of Manhattan and the Empire State Building through one of the archways of the Manhattan Bridge. This is a pretty clichéd shot and one that you may have seen used in the film Once Upon a Time in New York but one that I had to take myself. I wanted to get low to the manhole cover so that you could also read the N.Y.C embossed in the metal. It's virtually impossible to photograph this area without any other people in the shot due to how popular it is.

Samyang AF 35mm f2.8 FE @ 1/200th sec, f8, ISO 100


Brooklyn Bridge Park piers offer truly amazing views of "The Big Apple". This area is filled with photographers looking to capture the perfect shot showing the city's skyscrapers in all their glory. This spot is a great place to take in a beautiful sunset.
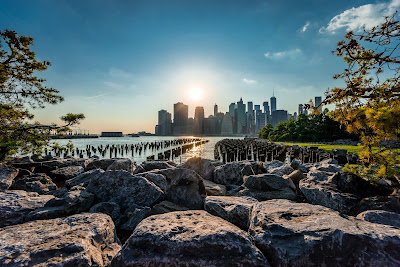
Samyang AF 14mm f2.8 FE @ 1/640th sec, f13, ISO 100
Samyang AF 14mm f2.8 FE @ 5 seconds, f22, ISO 50


Whilst on my way to the Roosevelt Island Tramway and looking for interesting things to photograph I stumbled across the Bloomberg Tower (also known as One Beacon Court) at E58th street. Here I chatted with a doorman of the building and showed him this image that I'd just captured. He told me about the building and said that he'd never seen it captured at this angle before.
Samyang AF 14mm f2.8 FE @ 1/200th sec, f10, ISO 125


The Roosevelt Island tramway runs from E60th Street, Manhattan over to Roosevelt Island. It only costs a few dollars to take the trip over and you get to take in a different perspective of the city.
Samyang AF 14mm f2.8 FE @ 1/400th sec, f8, ISO 100


The World Trade Center Transportation hub or "Oculus" as it is also known is an incredible building with sleek lines which was designed by Spanish architect Santiago Calatrava and built at a cost of $4 billion. This a most definitely a building worth visiting if you're a fan of modern architecture. I love the amazing sleek, white lines of this beautifully designed building. From the outside it looks quite small amongst the other skyscrapers around it but when you get inside the scale of it is pretty spectacular.
Samyang AF 14mm f2.8 FE @ 1/25th sec, f22, ISO 64


Another place that I recommend to shoot from (possibly a great spot to shoot a nice sunrise) is Exchange Place Waterfront over in Jersey City. This spot is accessible via a short subway ride from the Oculus transportation hub (above). Here you get an amazing panoramic view of the city and it's skyscrapers.
Samyang AF 35mm f2.8 FE @ 1/125th sec, f11, ISO 50
(Yes, that is me in the photo)


A short walk from Oculus, on Fulton St, it's possible to get an image that fits the One World Trade Center building in the frame. It took me a while to get this shot due to the city's crazy traffic.
Samyang AF 35mm f2.8 FE @ 1/60th sec, f8, ISO 100


Tudor City Overpass is another stunning vantage point. You get a beautiful view virtually from one side of Manhattan over to the other taking advantage of the long, straight roads and the trees make for a beautiful composition. It's also possible (if you shoot in portrait) to get the beautiful, art deco architecture of the Chrysler Building in the shot.
Samyang AF 35mm f2.8 FE @ 1/15th sec, f18, ISO 50


Yet another must-do while in New York is a beautiful green park/walkway known as the High Line. Built on a former rail line this 2.3km elevated trail offers a great viewing platform over the westside of Manhattan. During the walk you'll come across some cool architecture including the Zaha Hadid Architects' 520 West 28th building which was still in the process of being built while I was there but from what I saw it looked like a stunning building.
Samyang AF 35mm f2.8 FE @ 1/250th sec, f8, ISO 100
(shot through a dirty glass window)

Samyang AF 35mm f2.8 FE @ 1/200th sec, f6.3, ISO 100

Samyang AF 35mm f2.8 FE @ 1/160th sec, f7.1, ISO 100


On my last day in New York I had a few things that I wanted to see and tick off my list. One was the Guggenheim Museum which is situated in the Upper East-Side area of Manhattan between E88th and E89th Street, adjacent to Central Park. Of all days for me to visit, on this particular day the building was closed. I was so disappointed. I still wanted to shoot the stunning Frank Lloyd Wright architecture and wanted to have a NYC yellow cab in motion going past the building during my shot.

Samyang AF 14mm FE f2.8 @ 1/15th sec, f22, ISO 50


Here's another image I shot on the last day of my visit. This time a portrait taken with the AF 50mm f1.4 FE. As I walked back to my hotel to collect my belongings and check out I noticed this homeless man with so much character and detail in his face and beard. He was sat on the sidewalk in a shaded area but the light was so bright that it made him squint his eyes a little. I gave him a few dollars and asked him if I could take his picture and he obliged. This portrait blew my mind with how sharp the details were. I only wished that I'd spent a little more time photographing some more New York characters while I was there. Maybe something for my next trip, whenever that may be.

Samyang AF 50mm f1.4 FE @ 1/500th sec, f2.2, ISO 100


During my most recent visit I clocked up over 55km of walking across the space of three and half days in near 40° blazing sunshine so I think I earned the numerous pizza slices that I consumed during my trip. I got to see different sites to my previous two visits and experienced different things this time around also but I'm still left wanting to see more that New York has to offer. I can't wait to go back with my wife again in the future and take our two boys to experience the "Big Apple" and see it once again. Next time with more of the Samyang range of lenses to capture New York from a different perspective

Thanks for reading!

Check out my reviews for the three Samyang lenses used in this article for Sony E-mount below:

Samyang AF 50mm f1.4 FE review
Samyang AF 14mm f2.8 FE review
Samyang AF 35mm f2.8 FE review

I'd like to thank Alice and all involved at Samyang Korea for sending the lenses out to me.

For more information on Samyang products please take a look at their website - samyanglensglobal.com and subscribe to their newsletter to keep up to date with product news.


Follow me on my social media channels:
FLICKR

Samyang AF 35-150mm f2-2.8 FE